I am trying to make a guide and maybe later if time allows might do a batch script to install (will be learning curve). Along the time I’ve been always enthusiastic with DIY/privately managed servers. Tried CENTOS, UBUNTU and finally I think Debian sound just fitting and working without much hassle. I also have to give big thanks to Hestiacp team as they are doing a great job bringing myself “back to life”
Clean install from your VPS provider Debian10
sudo apt-get update and sudo apt-get upgrade
setup SSH login
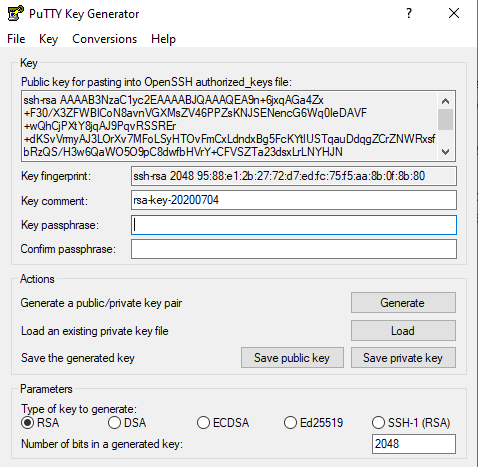
I usually use Putty and generate a private key with puttykeygen and than save it in secure location.
see below an example:
2.1 once you have the key Save the private key and with other right mouse button on public key select all and than copy to clipboard
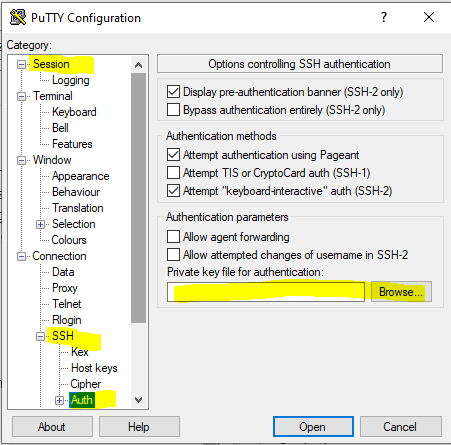
2.2 setup putty login
2.2.1 Add all information to “Sessions” Hostname or ip should be: username:ipaddress Give a name to Save Session and press save.
2.2.2 Click on the saved session and press Load and add the Private key saved earlier in secure location to:
SSH > Auth and browse your key,
Go back to sessions and Save.
See below for guide
login yo your machine as normal via putty
3.1 I just used the normal user (you can change or not depending on how strict you are with security >but I kept the same user as is just myself managing the server. Setup the SSH keys
3.1.1 #Create directory mkdir ${HOME}/.ssh;
3.1.2 #add public key cat > ${HOME}/.ssh/authorized_keys
past the public key to this file and press ctrl-d and again ctrl-d
3.1.3 #permissions may need fixing chmod u+x,go-rwx ${HOME}/.ssh chmod go-wx ${HOME}/.ssh/authorized_keys
3.1.4 Logout and login again and key should be working
Sort our the hostname and hosts
4.1 #hostname sudo nano /etc/hostname
remove the domain inside the file and add your own server domain ‘subdomain.domain.com’
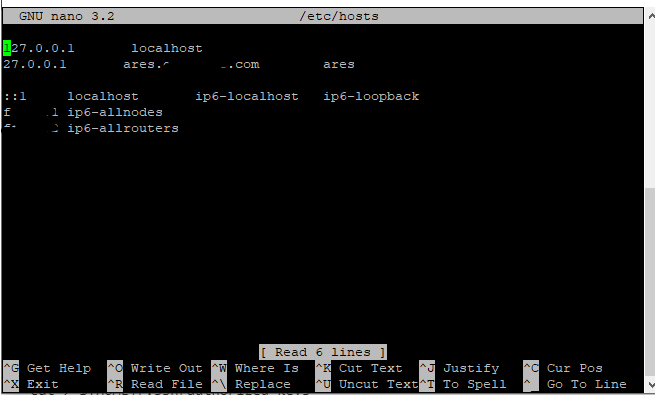
4.2 #hosts sudo nano /etc/hosts
add your domain below picture will give an example how I setup mine
i removed ipv6 because i do not know what I am sharing
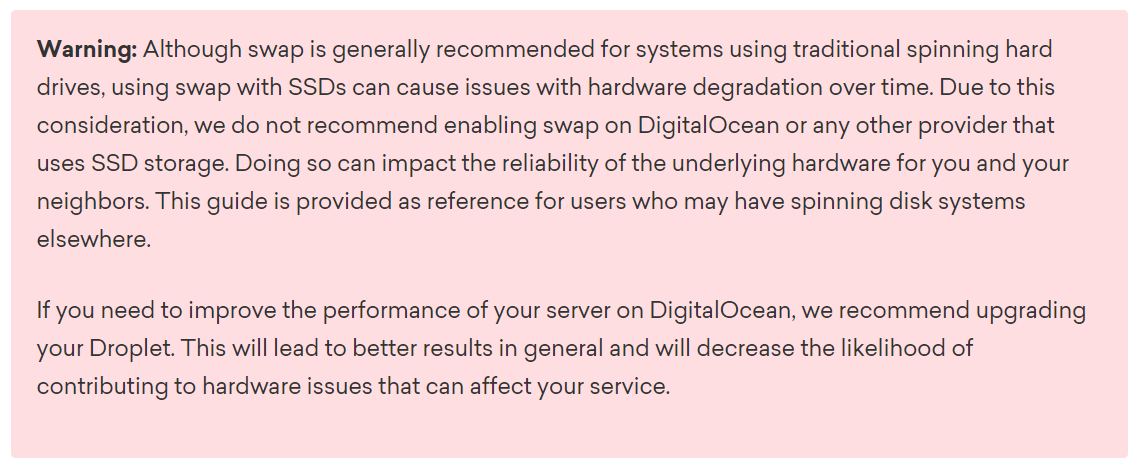
Swap space if you are limited with server memory just add extra swap ram How To Add Swap Space on Debian 10 | DigitalOcean
6.1 df -h sudo fallocate -l 8G /swapfile ls -lh /swapfile sudo chmod 600 /swapfile ls -lh /swapfile sudo mkswap /swapfile sudo swapon /swapfile sudo swapon --show free -h sudo cp /etc/fstab /etc/fstab.bak echo '/swapfile none swap sw 0 0' | sudo tee -a /etc/fstab sudo /bin/sh -c 'echo "vm.swappiness = 10 \n'vm.vfs_cache_pressure=50'" >> /etc/sysctl.conf' free -h sudo reboot now
Install Hestia
Follow the guide I have previously I wanted to have postgre and mysql just because i like to try new softwares and sometimes they require postgre so I did add this as well along with multiple php selector.
7.1 wget https://raw.githubusercontent.com/hestiacp/hestiacp/release/install/hst-install.sh apt-get update && apt-get install ca-certificates bash hst-install.sh -o yes -g yes -m yes
make the CLI commands working correctly I followed below link Command not found - #5 by eris
8.1 #Add to end of the file: sudo nano /root/.bashrc if [ "${PATH#*/usr/local/hestia/bin*}" = "$PATH" ]; then . /etc/profile.d/hestia.sh fi
8.2 #change sudoers
quote out current Defaults by adding in # on the begining
add below quoted out line following line: Defaults secure_path="/usr/local/sbin:/usr/local/bin:/usr/sbin:/usr/bin:/sbin:/bin:/snap/bin:/usr/local/hestia/bin"
done
The above is to improve as I sure other configuration could be done better. It is small guide which I find useful. And I would like to see your thought and suggestions to improve it
Becare full as “cloud-init” could contain information for remote storage files and many more… Just keep them. Often you select a key with them so you don’t have to upload it manually
For me
When clean server / vps has been deleverid
Create a new user with adduser Do not use this user for any thing related to Hestia unless you want to be you biggest security risk
upload your ssh key to .ssh/authorized keys with any method
Preferred way: What is ssh-copy-id? How ssh-copy-id works? how ever other system are fine
(Check connection if it works with out entering password)
nano /etc/ssh/sshd_config
PasswordAuthentication no
PermitRootLogin no
systemctl restart ssh
Add username as sudoers
echo “username ALL=(ALL) NOPASSWD:ALL” >> /etc/sudoers.d/username
Every time a restarted my VPN I kept seeing added my provider Hosts details added which I though is not nice :s .I take it is not an issue to keep getting my providers details as long i can add my detais?
On your view do you have a suggestion hosts setups? Is just simple as adding my details as I did?
Which user are you referring? The root or the new user suggested to create?
Is there any other advise or steps I m missing you could advise in adding? In order to have this server properly installed?
Do I really need the SUDO user ? If my aim is just install hestiacp and leave it running? If to install other packages I can alway use the root user and thats it?
The website I was planning to have a domain for the server as admin with localhost.domainserver.com and .domainserver.com and than a user for other applications or domains? Will this way be right way of setting up?
nah, i usualy use only the root user to install and run hestia, but use ssh key login to prevent brute force, even if they are behind a firewaöö which blocks untrusted subnets.
I use my domain with a seperated zone and call my servers web001.web.domain.tld, web002… and so on.
You basically don’t need to use SWAP on VPS. SWAP may be good option when running memory intensive apps, using hibernation or having HDD.
You can basically guess whether cloud provider is good in its field or not by checking for SWAP partition/file. If it is created by default and the disk is HDD, then it’s often times a bad sign or the provider just doesn’t care about using resources effectively.
sorry, but I have to heavily disagree with that advice
in opposite: disabling swap shows a big misunderstanding on what swap is for and why it should always be enabled. even if you have you sufficient RAM and also still while running on HDD.
true thing, SWAP is no replacement for RAM nor some kind of simple extension. however, SWAP allows the system and memory manager to get rid of old memory pages that are highly unlikely to be used again and with that frees up ressources that can then be used again.
in the easiest example that freed up memory can be used as filecache instead of being blocked for nothing and therefore help speeding up the system.
I do agree that if you don’t have enough RAM for your intended use case, SWAP won’t help you or instead of having you run into OOM errors might slow your system down by eating up IO. but again that’s no reason to turn off swap at all - rather use settings like swappiness to tune the behaviour or get more RAM but still let the system manage the memory.
all that said: trying to judge a provider based on misunderstanding the concept of swap is a very bad idea - at least in my humble opinion
@falzo - thanks much for another view on the topic.
However, please let me do put emphasis on the most crucial point:
Proper configuration of services is required though. Otherwise you risk OOM as you pointed out. However it’s better IMHO to see OOM in action & act accordingly - either opt for more RAM or fix issues connected therewith.
With perfectly configured services & huge amount of RAM, there is no huge need for SWAP when running on VPS. Do you disagree with this statement?
Swap really should always be made available, for full memory management purposes. You can turn down swappiness to its’ minimum setting, especially important for SSD/NVMe. I have to wince at those amateurs who create swap files greater than 2GB though. :-o
Just done my first Hestia install ever and jumped straight to Debian 10. I never understand the fascination with Ubuntu as a server OS - Debian/CentOS for goodness’ sake! (From a UNIX purist perspective).
With the supplied VPS provider’s template, I needed to install curl - first hurdle passed.
Received two errors about SSL though - should’ve copied them down - I’ll see if it is logged someplace.
Is Hestia supposed to install a LE certificate for the host automatically, or stick with the self-certified one? When I asked for an LE for the admin web site (the same FQDN), it installed, with no problem.
BTW, it’s excellent that the default admin account attaches to the hostname - not all control panels have the foresight to do this. Well done!
Ubuntu LTS Server Editon (every other release) is stable as you need for a server OS I suggest to stay clear from the all 18.10/19.10 and your are fine
Had till a few years ago (When I left the company a running still using Ubuntu 10.04 and still worked like a charm.)
@eris You missed my point: why Ubuntu at all? It’s based/forked from debian anyway - so stick to the “grass roots” version. Linux Mint on a desktop/laptop however is much more meaningful. Last time I installed a Windoze Server (you know, another desktop OS that has been shoehorned into server duties) was 20 years ago!